上一章节我们讲解了“基于RFC723X标准HTTP协议”的内容,本章主要讲解“接口性能测试—JMeter测试HTTP GET”的内容。

一、HTTP Request配置项解析
Web Server:
1.Protocol [http]:
若为HTTP协议可以不填写(默认为HTTP);
若为HTTPS协议可以填写“https”;还可以为FILE协议(本地文件传输协
议);
2.Server Name or IP:
HTTP/Web服务器的域名或IP地址,本机可以使用localhost或127.0.0.1
表示;
3.Port Number:
HTTP/Web服务器的监听端口,若为HTTP协议,默认端口为80;若为HTTPs
协议,默认端口为443。
使用默认端口可以不填,非默认端口必填。
HTTP Request:
1.Method:
请求方法,测试GET请求,请选择“GET”。
2.Path:
HTTP请求行中的request-target,可以使用绝对地址或相对地址。
比如: http://www.test.com/ecshop/index.php (绝对地
址)
/ecshop/index.php(相对地址)
注意: 若使用绝对地址,则会覆盖“Web Server”中的配置。
3.Content-encoding:
通常用于在发送POST、PUT、PATCH请求时对message-body进行内容编
码,
以防止请求出现乱码或服务器无法正确处理请求。
注意其与请求的首部字段“Content-encoding”无关。
4.Redirect Automatically:
自动重定向。在JMeter中不记录重定向的过程,只能看到最终的重定向请
求。
5.Follow Redirects:
跟随重定向。在JMeter会详细记录重定向的过程,可以看到多个重定向请
求。
其中4与5是互斥的。
比如,使用http://www.sina.com.cn/访问新浪,会有一次重定向:
第一次请求: GET http://www.sina.com.cn/ 重定向返回:
Location: https://www.sina.com.cn/
第二次请求: GET https://www.sina.com.cn/
若设置自动重定向,在查看结果树中只能看到最终的请求:GET
https://www.sina.com.cn/
若设置跟随重定向,可以看到全部的两次请求。
6.Use KeepAlive:
勾选在请求中加入首部字段“Connection: Keep-Alive”,
否则设置为“Connection: Close”,默认为勾选。
7.Use multipart/form-data:
是否以multipart/form-data传输message-body。
8.Browser-compatible headers:
勾选此项,在使用multipart/form-data时,会抑止Content-Type与
Content-Transfer-Encoding首部字段,仅发送Content-
Disposition首部字段。
二、应用案例
测试案例说明
1. 接口说明:
查询被购买商品的总金额接口
2、请求方式:
HTTP GET请求
3、接口地址:
/ecshop/upload/goods.php
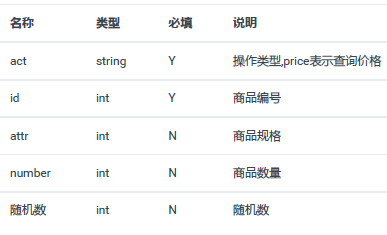
4、请求参数:
1) 输入参数:

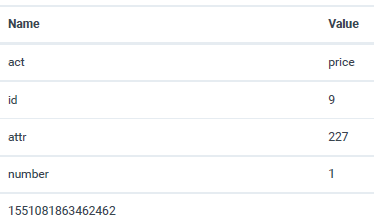
2) 请求示例:
GET /ecshop/upload/goods.php?
act=price&id=9&attr=227&number=1&1551081863462462
HTTP/1.1
Accept: */*
X-HttpWatch-RID: 22945-10042
Referer: http://localhost/ecshop/upload/goods.php?id=9
Accept-Language: zh-Hans-CN,zh-Hans;q=0.8,en-
US;q=0.5,en;q=0.3
Accept-Encoding: gzip, deflate
User-Agent: Mozilla/5.0 (Windows NT 10.0; WOW64;
Trident/7.0; rv:11.0) like Gecko
Host: localhost
Connection: Keep-Alive
Cookie: ECS[history]=9; ECS[visit_times]=2;
ECS_ID=2a50bfdc24b5443814e73a5783912e21a55af811
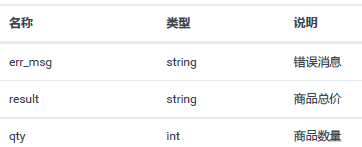
5、返回参数:
1) 响应参数:

2) 响应实例:
HTTP/1.1 200 OK
Date: Mon, 25 Feb 2019 08:16:27 GMT
Server: Apache/2.2.4 (Win32) PHP/5.2.4
X-Powered-By: PHP/5.2.4
Cache-control: private
Content-Length: 50
Keep-Alive: timeout=5, max=86
Connection: Keep-Alive
Content-Type: text/html; charset=utf-8
{"err_msg":"","result":"\uffe52298\u5143","qty":1}
测试步骤
1、在“Test Plan”节点上右键,选择Add-->Threads(users)-->Thread
Group;
2、在“Thread Group”节点上右键,选择Add-->Sampler-->HTTP
Request;
3、在“HTTP Request”节点上右键,选择Add-->Listener-->View
Results Tree;
4、选中“HTTP Request”对HTTP请求进行配置;
5、点击“Save”,保存测试计划;
6、点击“Start”,运行JMeter测试。
HTTP GET请求的参数有两种基本的配置方法:
1、 放在Path配置项中:

2、放在Parameters选项卡中:

本章节我们学习了关于“接口性能测试—JMeter测试HTTP GET”的内容就到这里了,大家觉得文章有用的话记得每天来这里学习涨薪技能。